🎬 Watch a whole section
Longer videos that walk through everything in one go. Tap a part to jump to it.
▶ Everyone at dismissal · 6:44
▶ Everything for admins · 7:18
Getting started
DismissPro replaces walkie-talkie chatter and paper lists with one live board that every teacher and staff member sees at the same time. When a car pulls up, one tap moves those students to Arrived on every screen.
1. Create your school's account
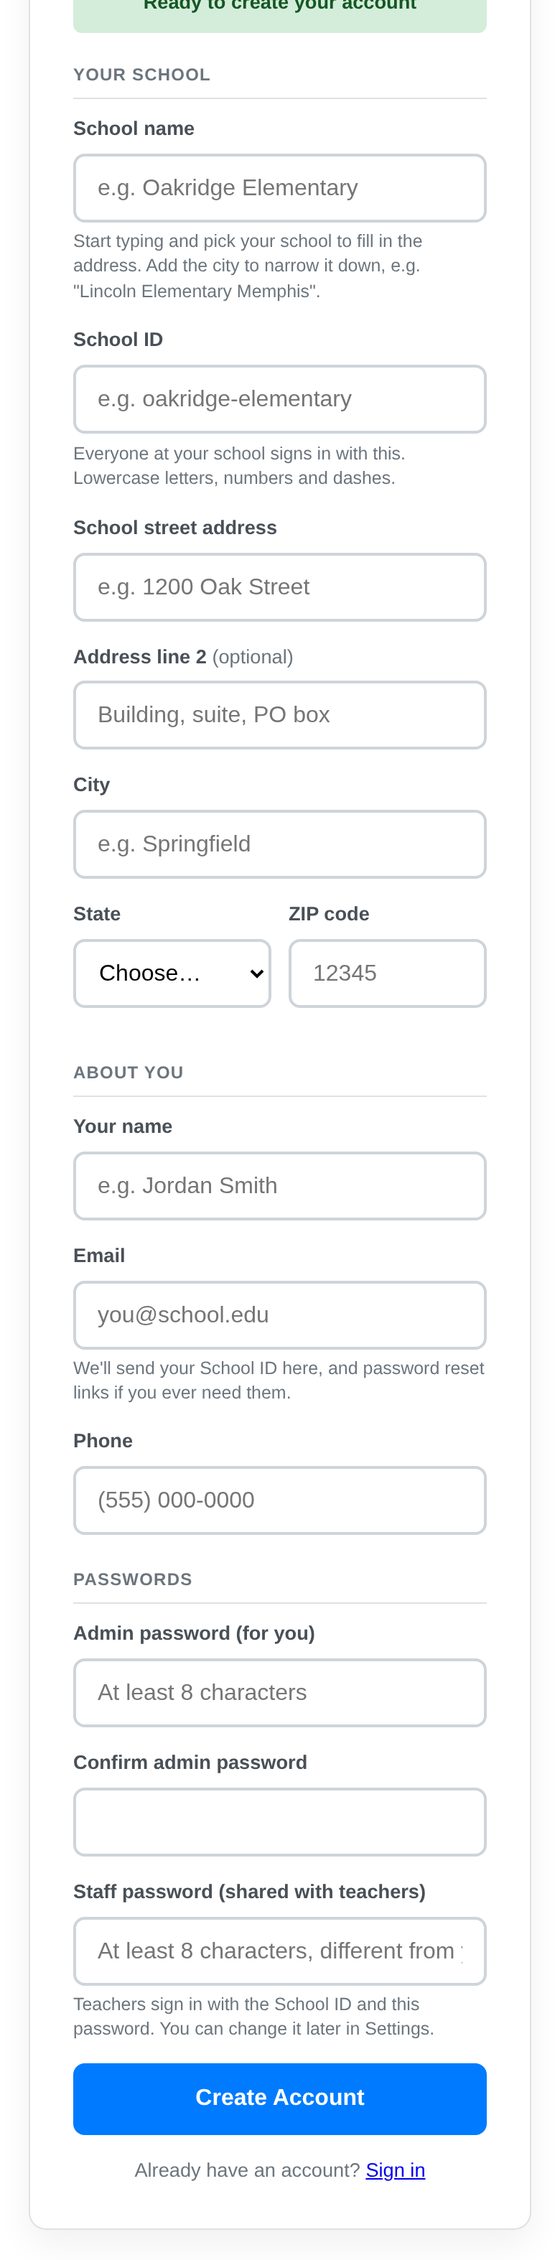
Fill out the sign-up form on the homepage. It takes about a minute.
- School name: start typing and pick your school from the list to fill in the address automatically. Adding the city helps, for example "Lincoln Elementary Memphis".
- School ID: the short name everyone at your school signs in with, such as
oakridge-elementary. If the one you want is taken, you'll see suggestions to choose from. - Your email: we send your School ID here, and password reset links if you ever need them.
- Two passwords: an admin password for you, and a staff password you'll share with teachers. They must be different and at least 8 characters.
Choose Create Account and you're signed in right away. It's free for 12 months after signup.
2. Add your students
Upload your whole roster from a spreadsheet (see Uploading your roster), or add students one at a time (see Adding and editing students).
3. Share the School ID and staff password
Give teachers and dismissal staff your School ID and the staff password. They sign in on any phone, tablet or computer. Nobody needs their own account.
4. Add DismissPro to your home screen (optional)
DismissPro runs in any web browser, with nothing to install. To open it like an app:
- iPhone or iPad (Safari): tap the Share button, then Add to Home Screen.
- iPhone or iPad (Chrome): tap the Share button at the right end of the address bar, then Add to Home Screen (iOS 16.4 or newer).
- Android (Chrome): tap the ⋮ menu, then Add to Home screen or Install app.
- Computer (Chrome or Edge): click the install icon at the right end of the address bar.
Signing in Everyone
▶ Watch the video · 0:40
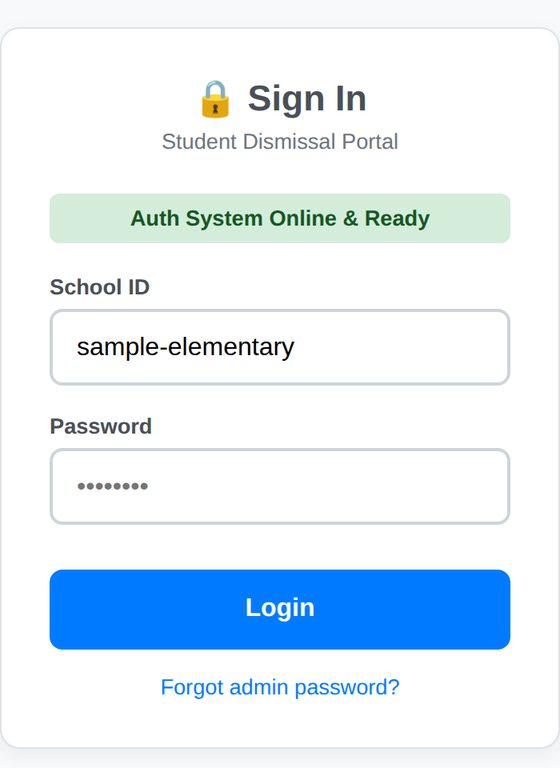
Go to dismisspro.app/app/login.html, or tap Sign In at the top of the homepage.
- Enter your school's School ID.
- Enter your password. The password decides what you can do:
- Admin password: full access, including adding students, uploading rosters, sending alerts, reports and settings.
- Staff password: everything needed to run dismissal, such as marking students Arrived, Left or Dismissed.
- Choose Login.
You'll stay signed in for up to 12 hours, so a morning sign-in lasts through afternoon dismissal.
Finding your way around Everyone
▶ Watch the video · 0:52
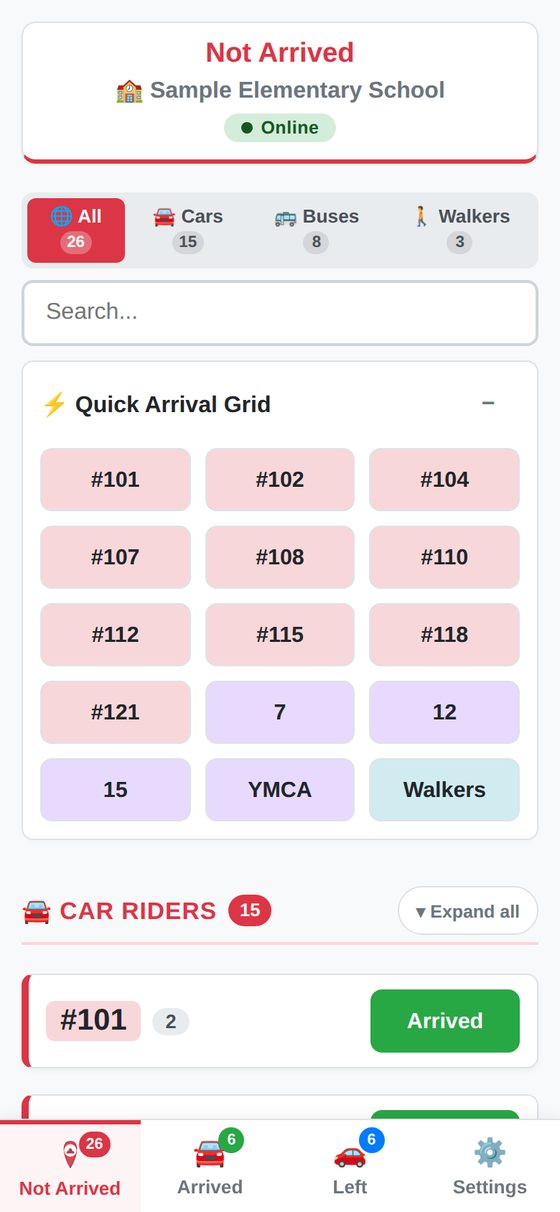
Four tabs run along the bottom of the screen. The number on each tab shows how many students are on that page right now.
| Tab | What it shows |
|---|---|
| Not Arrived | Students still waiting to be picked up. This is where most of dismissal happens. |
| Arrived | Students whose ride is here. Staff walk them out and mark them Left. |
| Left | Students who have gone home today. |
| Settings | Display options, filters, and admin tools. |
At the top of each page you'll see your school's name and a status badge:
- ● Online means you're connected and every change appears on everyone's screen instantly.
- ● Offline means the connection dropped. Keep working; see Wi-Fi and power outages.
Filtering and searching
- Use 🌐 All, 🚘 Cars, 🚌 Buses and 🚶 Walkers to show just one kind of rider. Each shows its own count.
- Type in Search to find a student by name or a car or bus by number. Press Enter to hide the keyboard.
- Students are grouped into Car Riders, Bus Routes and Walkers. Use Expand all or Collapse all to open or close every card in a section, or tap a single card to open it.
When you scroll down, the page title, status badge and filter bar stay pinned to the top. Tap 🔍 to bring the search box back. On Settings, the title and the admin tabs stay pinned the same way.
A very long bus or program name, like "All-Star After-School Group", is shortened with "…" so it never covers the buttons. Open the card to see it in full under each student's name.
Running dismissal Everyone
▶ Mark a car as arrived · 0:54
▶ Buses and walkers · 0:54
A typical afternoon: staff at the pickup line mark cars as they arrive, and teachers inside watch their students appear on the Arrived page.
Mark a car or bus as arrived
On the Not Arrived page, there are several quick ways to do it:
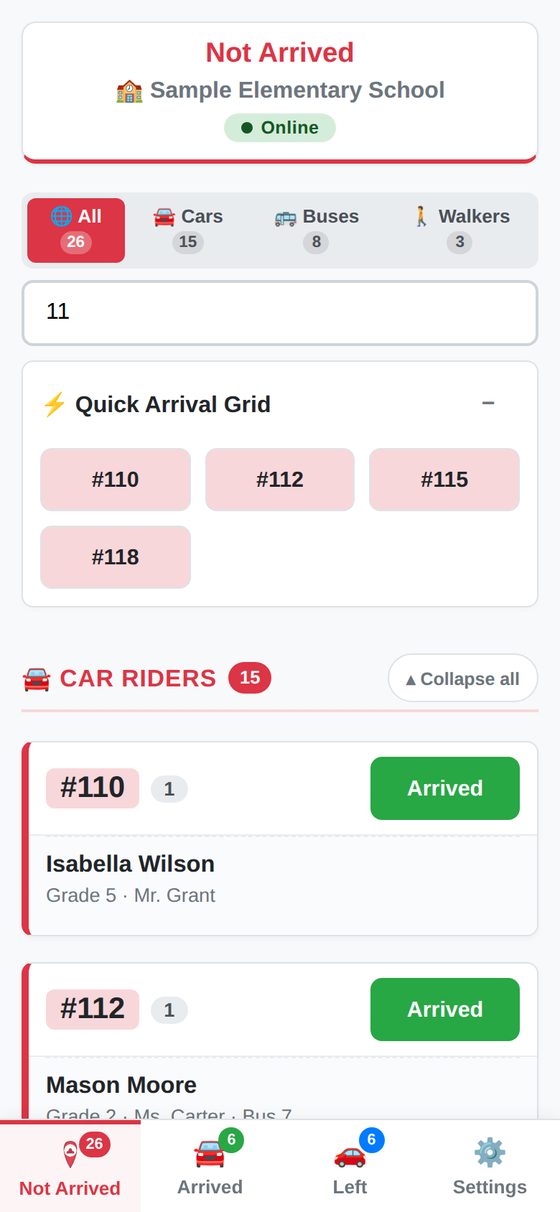
- Quick Arrival Grid: tap the car number or bus name in the grid at the top. Every student in that car moves to Arrived at once. Tap + or − to show or hide the grid.
- Number keypad: under the grid there is a 0–9 keypad. Tap the digits of a car number and the grid narrows as you type, so
1shows every car that starts with 1 and11narrows it further. Tap the matching car to move it to Arrived. ⌫ removes the last digit and Clear starts over. Tapping a car clears the number so the next car starts fresh. If you want the space back, tap 🔢 Keypad to hide it; it stays hidden on that device. - Scan the car's tag: if your cars have QR tags, tap 📷 Scan tags and point your phone at the tag. See Scanning and printing car tags.
- Search by number: type a car number, such as
11, in the search box. The grid narrows to matching numbers, so you can tap the right one quickly. - Arrived button: tap Arrived on any card.
Searching for a name hides the grid so the matching students are easy to see. Clear the search and the grid comes back.
Walkers
Walkers don't wait for a ride, so their card has Dismiss and Dismiss All buttons instead. These move walkers straight to Left.
Student notes
If a student has a note, such as "Grandma picks up on Fridays", it shows under their name with a ⚠️ symbol. Tap the note to read all of it.
What a card shows

- The car number or bus name, with the number of students in the group beside it.
- Each student's name, grade and teacher. You can turn grade and teacher badges off in Settings.
- A student's other ride, if they have one. For example, a car rider who sometimes takes the bus shows "Bus 12".
Arrived and Left pages Everyone
▶ Watch the video · 0:44
Arrived
Each card shows the time the ride arrived. When students get in the car or on the bus:
- Tap Left next to one student, or Left All for the whole car.
- Buses: tap ⬜ Tap when on the bus for each rider as they get on, then 🚌 Bus left for the whole bus. See Checking students onto the bus.
- Child here by mistake because they're not at school today? Tap 🏠 Absent. See Marking a student absent.
- Marked arrived by mistake? Tap Undo or Undo All to send them back to Not Arrived.
Left
A list of everyone who has gone home today. If someone was marked Left by mistake, tap Return or Return All to put them back on the Arrived page, in the same spot with their original arrival time. (Walkers who were dismissed straight from Not Arrived go back to Not Arrived.)

Absent students and bus boarding Everyone
▶ Mark a student absent · 1:09
▶ Check riders onto the bus · 1:06
Two quick taps keep your lists matching who is really at school and who really got on the bus.
Marking a student absent
Every student, car rider, bus rider or walker, has a 🏠 Absent button:
- On Not Arrived: open the student's car or bus card and tap 🏠 Absent under their name.
- On Arrived: if a child was put there by mistake (for example their whole bus was marked arrived), tap 🏠 Absent on their row.
Then:
- They move to the 🏠 Absent today list at the bottom of Not Arrived and are left out of the counts.
- When their bus or car arrives, everyone else moves to Arrived. The absent student stays put, and can't be marked Arrived or Left by mistake.
- Came in late, or marked by mistake? Tap Undo in the Absent today list.
- Already sent home? A student on the Left page can't be marked absent. Tap Return first if it was a mistake.
- The dismissal history shows them as Absent for that day. The mark clears the next morning.

Checking students onto the bus
Bus riders leave together, so on the Arrived page each bus works a little differently from a car:
- When the bus arrives, its riders move to Arrived as usual.
- Whoever is on bus duty (any staff sign-in, on a phone or tablet) opens the bus and taps ⬜ Tap when on the bus as each child steps on. It turns green: ✅ Boarded 3:12 PM.
- When the bus pulls away, tap 🚌 Bus left on the bus card. Everyone who boarded moves to Left.
- The bus card counts as you go, for example 6 of 10 boarded, then ✅ All 10 boarded. Anyone not tapped yet still shows the amber button, so a missing child stands out.
- If some riders aren't marked boarded when you tap Bus left, DismissPro lists them and asks first. Those children stay on Arrived so someone can find them.
- Not using the boarding check? If nobody on the bus is marked boarded, Bus left simply sends the whole bus, like before.
- Tapped the wrong child? Tap the green button again to clear it.
- Every phone sees the taps right away. The Left page shows each rider's boarding time, and it is saved in the dismissal history (the BoardedTime column).

Adding and editing students Admins
▶ Add a student · 0:56
▶ Edit a student or remove them · 0:54
Add a student
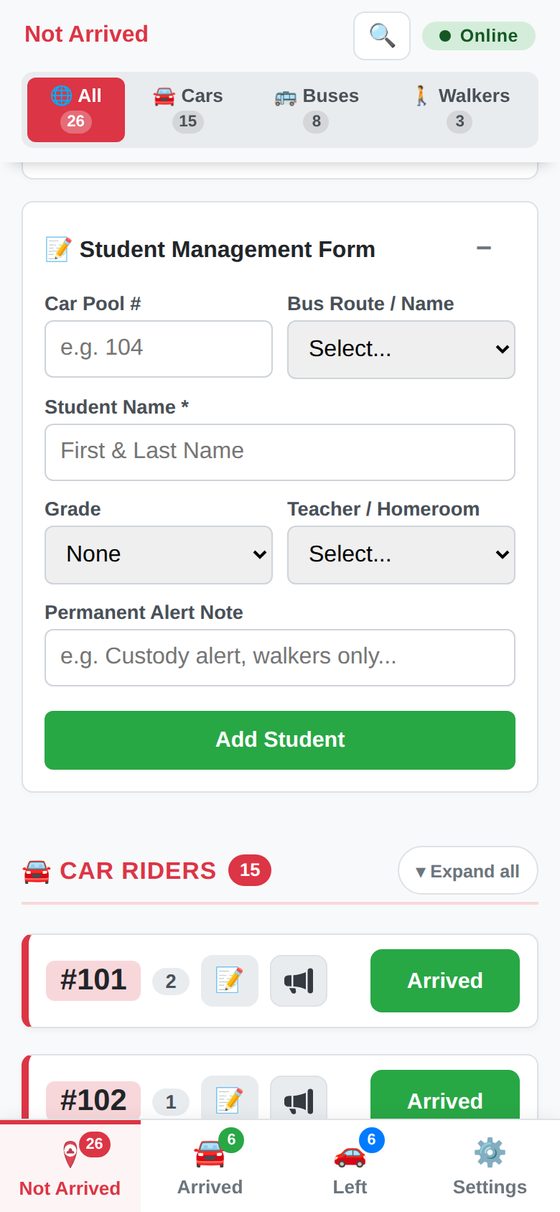
- On the Not Arrived page, open 📝 Student Management Form by tapping +.
- Enter a Car Pool #, a Bus Route / Name, or both. Leave both empty for a walker.
- Enter the Student Name, and optionally the grade and teacher.
- Add a Permanent Alert Note if staff should always see something, such as a custody alert.
- Choose Add Student.
Students with the same car number are grouped on one card, which is perfect for siblings.
Edit or delete

- 📝 beside a student's name edits that student. If you change their car or bus number, the page jumps to their new card after you save.
- 📝 on the card's top line edits the whole group at once, such as changing the car number for every sibling.
- 🗑️ deletes a student. You'll be asked to confirm first.
- sends a name to the alert banner. See Sending alerts.
- 📅 Today changes how a student goes home just for today. See Car, bus and walker changes.
Car, bus and walker changes Admins
▶ Change a ride just for today · 0:40
▶ When a bus breaks down · 1:13
Plans change. DismissPro handles both kinds of change, and you never need to edit the student:
- Just for today: going home with a friend, riding the bus to Grandma's, or walking today. Everything goes back to normal automatically the next day.
- From now on: a permanent change, such as a student who now rides the bus every day.
- A bus broke down: move everyone on that bus to the replacement bus for today. See When a bus breaks down.
Switch between car, bus and walker
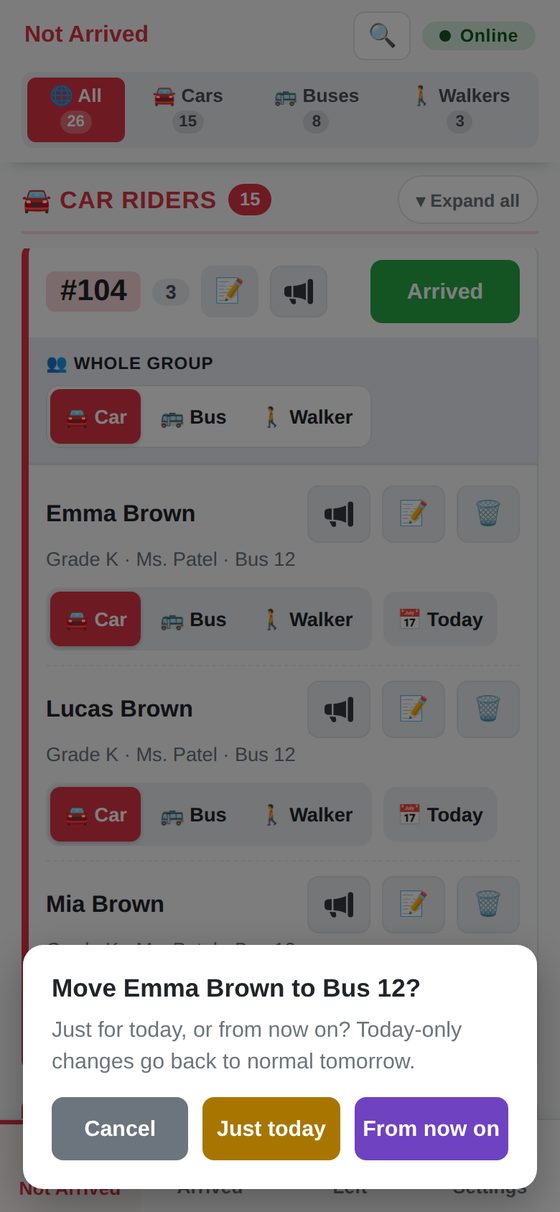
- On the Not Arrived page, open the student's card.
- Under the student's name, tap 🚘 Car, 🚌 Bus or 🚶 Walker.
- Choose Just today or From now on, or tap Cancel.
To move a whole family at once, use the Whole group switch at the top of the card. It only appears when the card has more than one student.
Going home with someone else today
When a student is going home in another family's car, or on a different bus, just for today:
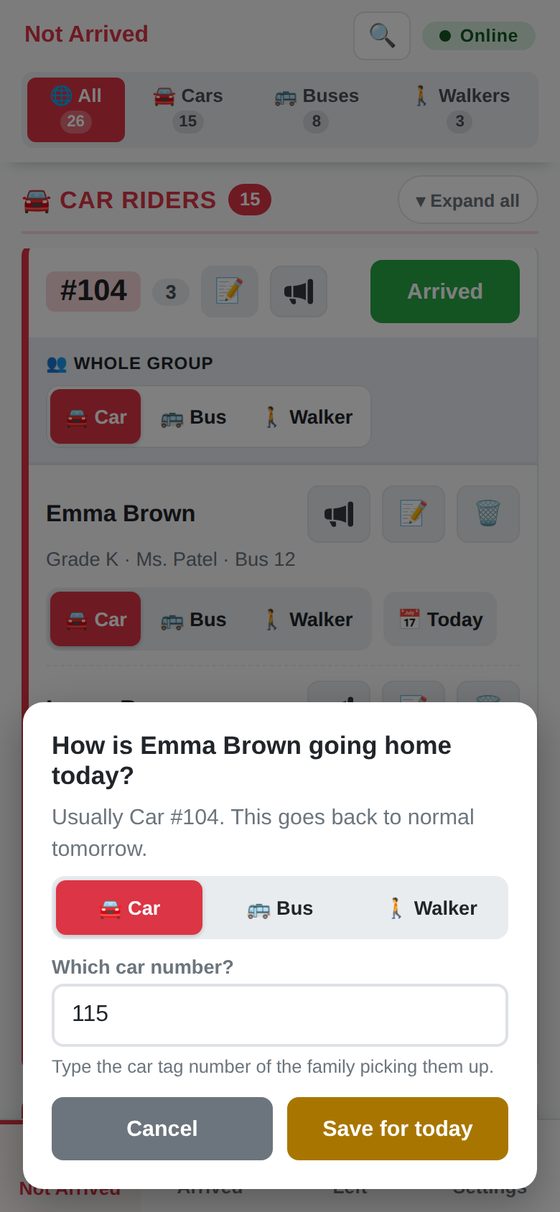
- Open the student's card and tap 📅 Today, next to the switch.
- Choose Car, Bus or Walker.
- Type the car number of the family picking them up, or the bus number or program. Suggestions appear as you type.
- Tap Save for today.
The student moves to that car or bus for today. Tomorrow they're back in their usual ride.
What everyone sees

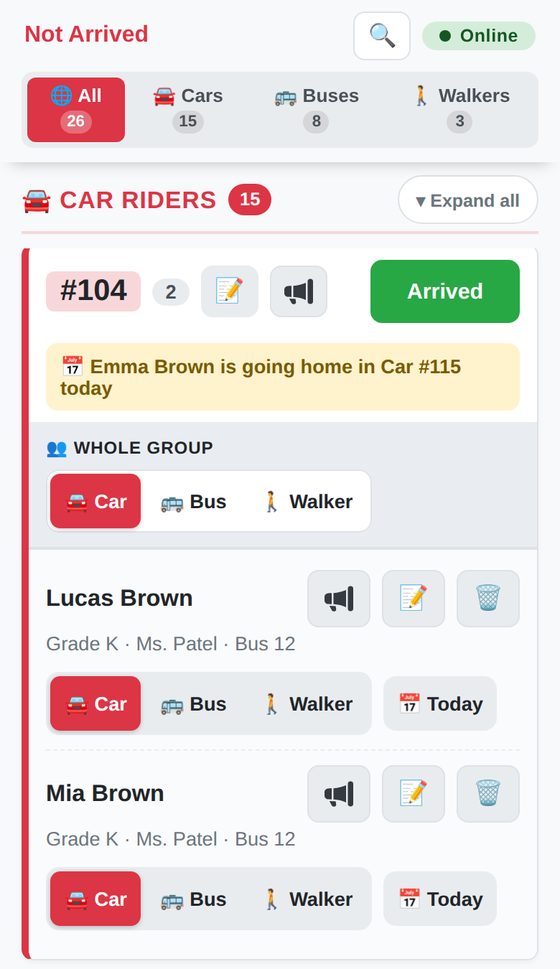
- The student shows in today's car or bus with a yellow badge, such as 📅 Today only · usually Car #104, on the Not Arrived, Arrived and Left pages.
- Their usual car or bus shows a note, such as "Emma Brown is going home in Car #115 today", so nobody goes looking for them there.
- Staff see the badge and note but can't make ride changes. Only admins can.
When a bus breaks down
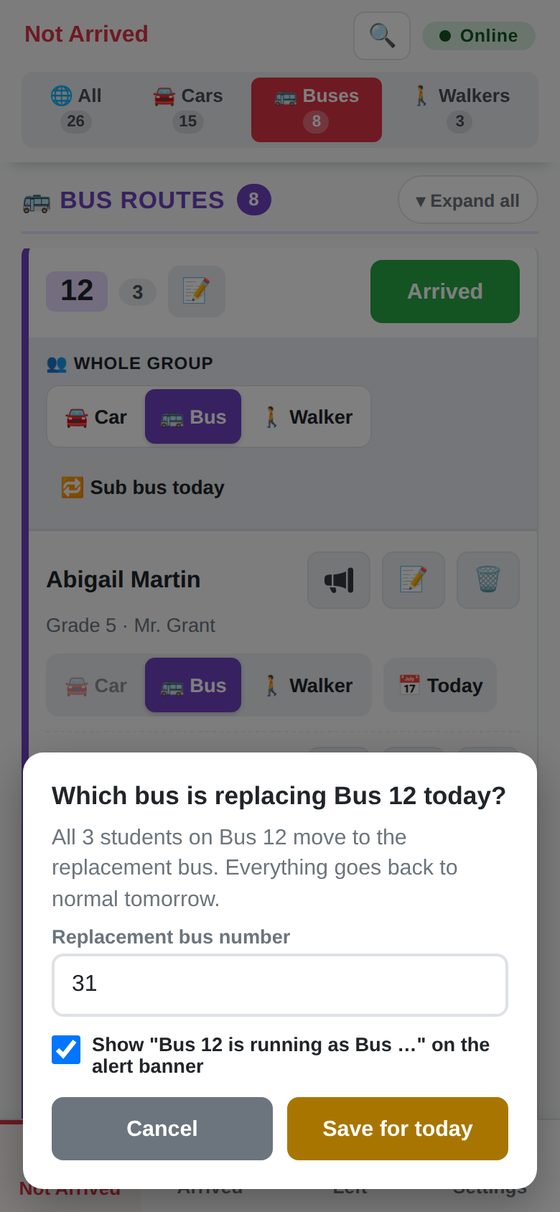

- On the Not Arrived page, open the broken-down bus's card. Tapping 🚌 Buses at the top makes it easier to find.
- Tap 🔁 Sub bus today.
- Type the number of the bus that's replacing it.
- Leave Show on the alert banner checked to tell every screen, for example "Bus 12 is running as Bus 31 today".
- Tap Save for today.
- Everyone who rides that bus moves to the replacement bus's card, labeled "🔁 Replacing Bus 12 today". That label also shows on the Arrived and Left pages.
- Staff who don't know about the swap can still search or tap 12: the replacement bus comes up.
- Students who already have their own today-only change, like a student going home with a friend, stay where they are.
- Bus fixed early? Open the replacement bus's card and tap ↩️ Undo sub bus. Everyone goes back, and the alert is removed.
- Tomorrow everyone is back on their usual bus automatically. The dismissal history notes "Sub bus for Bus 12".
Undoing a change
- Changed your mind today? Tap 📅 Today and choose Usual ride, or tap the student's usual option on the switch.
- Tomorrow: every today-only change goes back automatically overnight. There's nothing to remember.
Bus company and parent updates Admins
▶ Watch the video · 0:51
If a bus or transportation company runs your school's buses, it can use SchoolPro Bus for free. Parents only get bus updates if that company signs up. Dismissal in DismissPro works the same either way.
What parents see
- When their child got on or off the bus, the time and the stop.
- An estimated arrival time while the bus is on its way.
- An email, a phone notification or neither, whichever they choose.
- Parents see only their own child, and there is no map.
What the driver sees
When a teacher marks a bus rider Left in DismissPro, the driver's phone shows that child as 🚸 Sent with the time, and how many were sent but aren't on the bus yet. The driver still taps On when the child gets on, so parents hear "on the bus" only when it's true.
Share it with your transportation company
- Open Settings and tap 🚌 Bus Company.
- Tap ✉️ Email it or 📋 Copy message. On a phone you can also tap 📤 Share.
- Once they have signed up, tick the agreement and tap Turn on the link. This lets the company see each bus rider's name, grade, homeroom and bus number.
- Give them the School ID and link code. They enter them at bus.schoolpro.app.
- Your school or the company sends families a letter with a family code. Parents use it at rides.schoolpro.app.
Bus times and notes for drivers
Your bus company plans its runs around your bell times, so tell it when buses drop off and pick up. Once the link is on:
- Open Settings → 🚌 Bus Company.
- Under Bus times, enter the Morning drop-off and Afternoon bus pickup times.
- Add Notes for bus drivers if you like: where buses line up, which door, loading order.
- Tap Save bus times.
The bus company sees the times and notes on its Schools list in SchoolPro Bus, and each driver sees them on their run list. Change them any time, for example on early release days.
Uploading your roster Admins
▶ Watch the video · 0:53
The fastest way to set up is to upload a spreadsheet of all your students.
- Go to Settings → 🛠️ Admin Tools.
- Choose Download Roster Template (.CSV) and open it in Excel, Google Sheets or Numbers.
- Fill in one row per student, using the columns below.
- Save or export it as a .csv file.
- Choose Upload and Override Roster (.CSV), pick the file, and confirm.
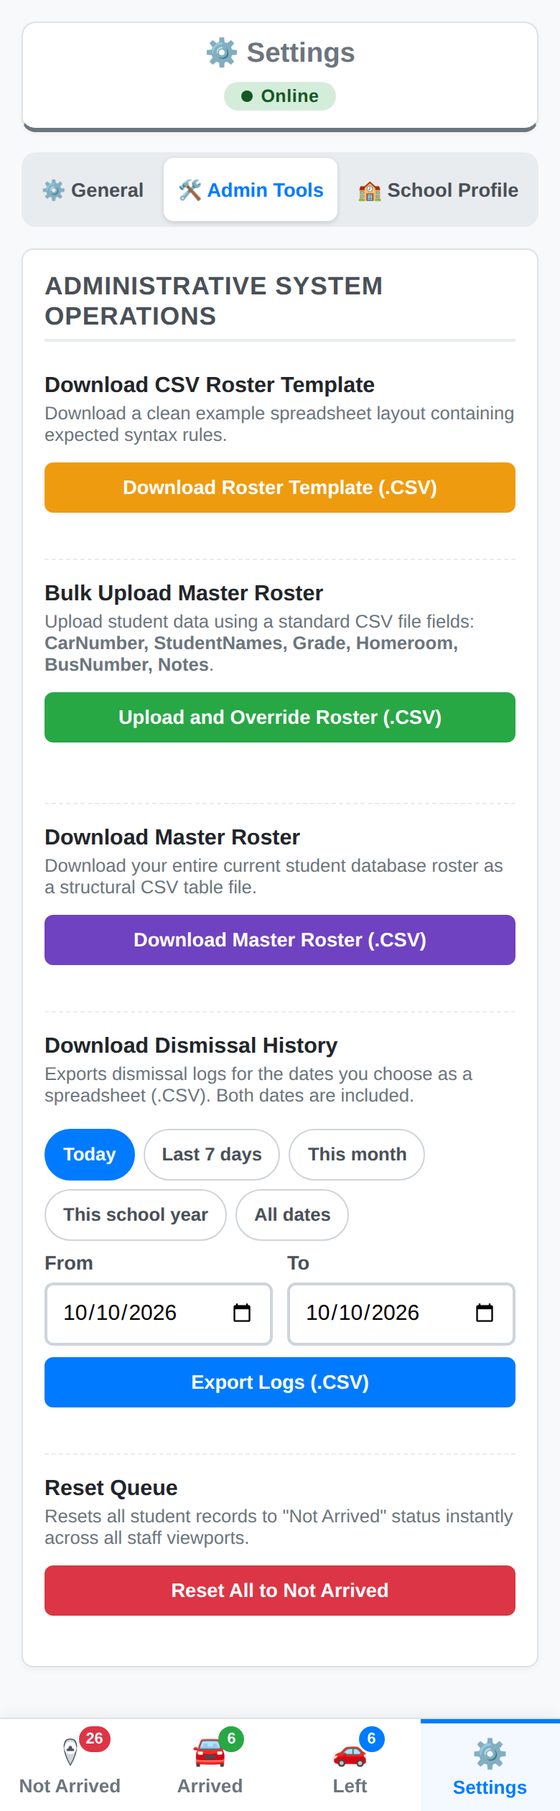
| Column | What to enter | Example |
|---|---|---|
| CarNumber | The car tag number. Use 0 or leave blank for bus riders and walkers. | 104 |
| StudentNames | The student's first and last name. Put each student on their own row; siblings share a car number. | Emma Brown |
| Grade | Grade level. | K, 1, 2 … |
| Homeroom | Teacher or room. | Ms. Patel |
| BusNumber | Bus number, or a daycare or program name. Use 0 or leave blank if none. | 12, YMCA |
| Notes | A permanent note shown to staff. Optional. | Custody alert: no pickup by dad |
A student with a car number starts as a car rider. A student with only a bus number starts as a bus rider. A student with neither is a walker.
Sending alerts Admins
▶ Watch the video · 1:02
Alerts appear as a yellow banner at the top of every staff screen, instantly. Use them for things like "Early dismissal at 1:30", or to say which students to send out next.
Type a message
Go to Settings → ⚙️ General → 🚨 System Alert Broadcaster, type your message and choose Send Alert.
Send a student's name with one tap
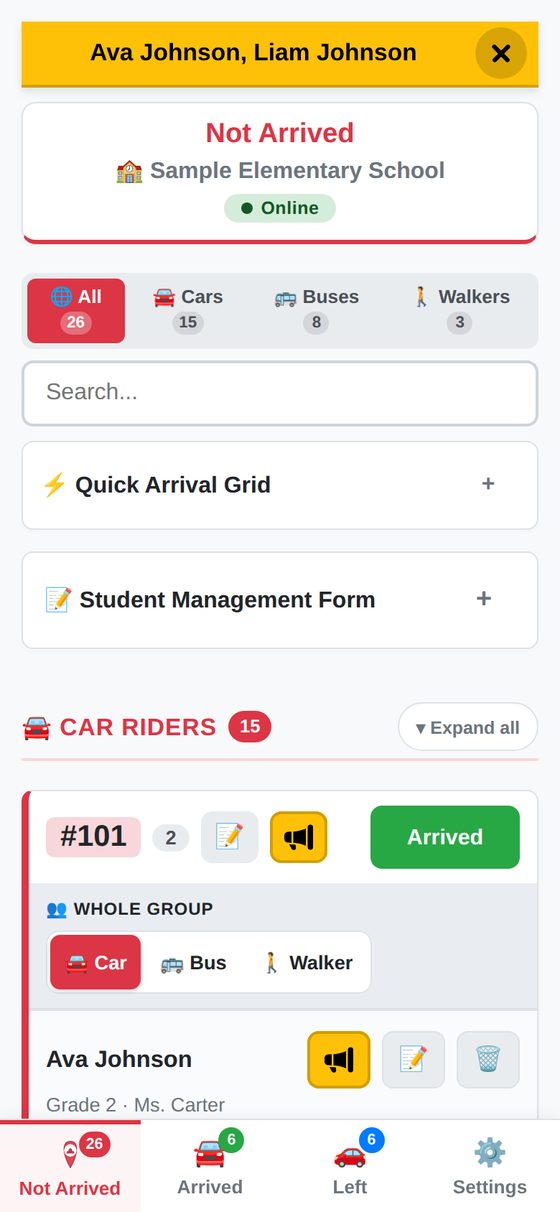
- Tap the megaphone button beside a student to add their name to the banner.
- Tap the megaphone on a car's top line to add everyone in that car. This isn't available on bus or walker cards, but you can still tap individual students there.
- The button turns yellow while that name is showing. Tap it again to remove the name.
- More names are added to the end, separated by commas.
Clear the alert
Tap the on the banner, or choose Clear Alert in Settings. It disappears from every screen. Alerts also clear automatically each night.
Settings
▶ Watch the video · 0:58
Staff see one Settings page. Admins see it split into three tabs.
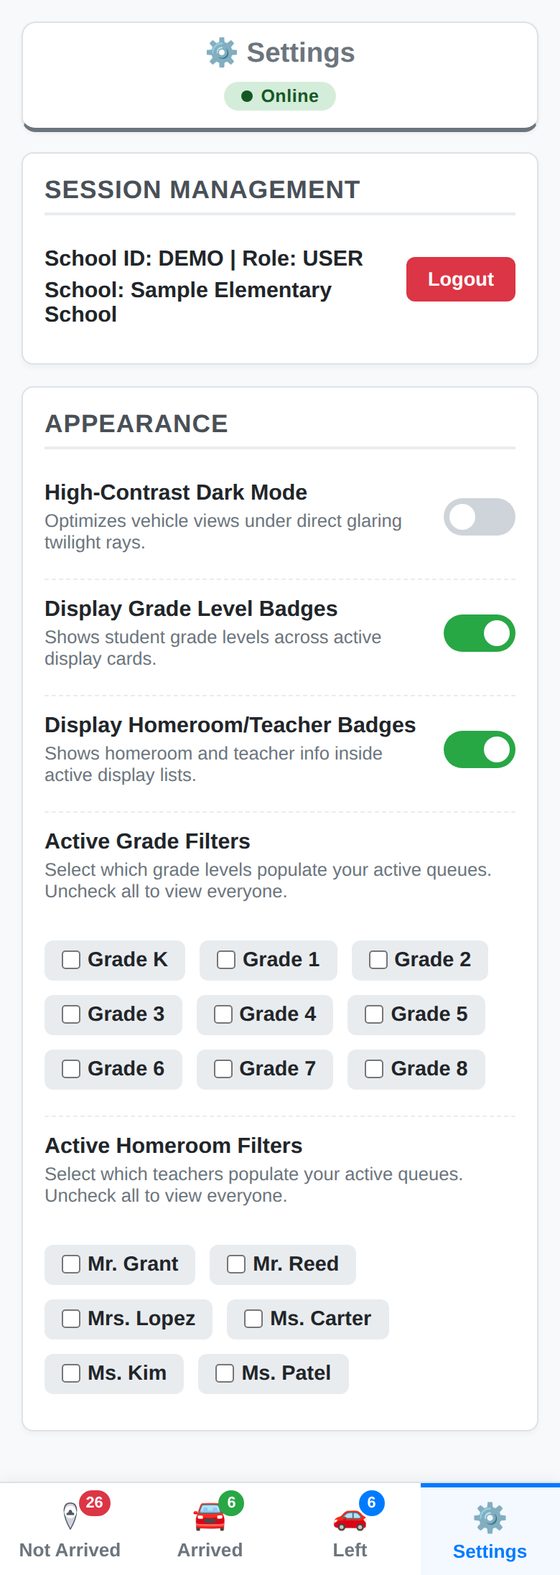
Display options Everyone
- High-Contrast Dark Mode: easier to read outdoors in bright sun or at dusk.
- Display Grade Level Badges and Display Homeroom/Teacher Badges: show or hide those details on cards.
- Active Grade Filters and Active Homeroom Filters: show only certain grades or classes. Uncheck everything to see all students again.
These settings are saved on each device, so changing them doesn't affect anyone else.
⚙️ General Admins
The display options above, plus the System Alert Broadcaster (see Sending alerts).
🛠️ Admin Tools Admins
- Download Roster Template, Bulk Upload Master Roster and Download Master Roster: see Uploading your roster.
- Download Dismissal History: see Reports.
- 🏷️ Car Tags (QR): upload your logo and print mirror hangers or dash sheets with a QR code and car number. See Scanning and printing car tags.
- Change Staff Password: sets a new shared password for staff. Devices signed in with the old password are signed out.
- Reset Queue: moves every student back to Not Arrived on all screens. You don't need this daily, since the board resets itself each night, but it's handy after a practice run.
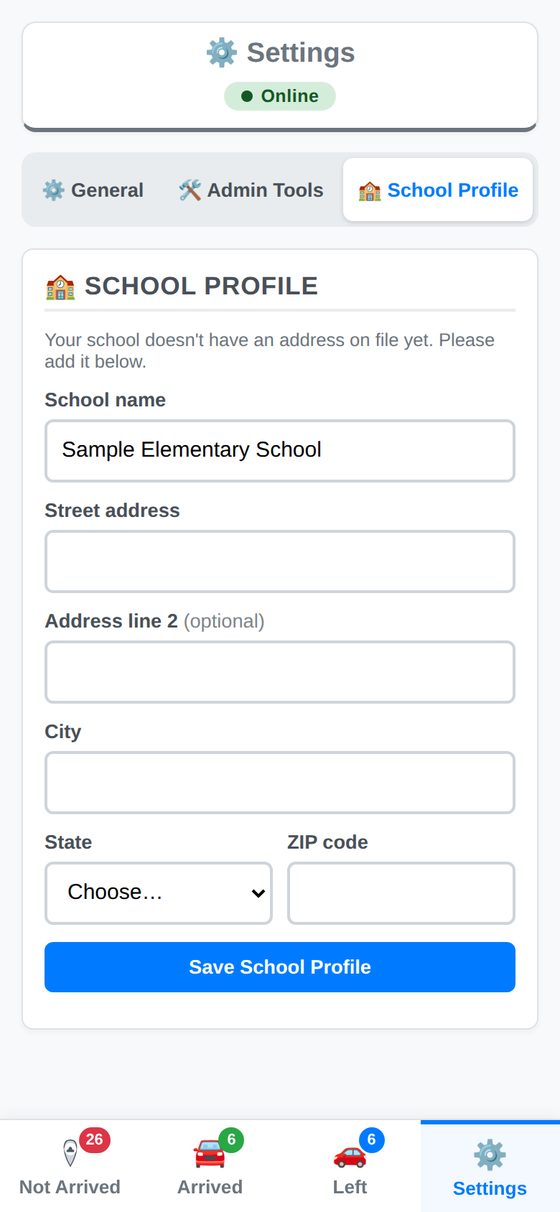
🏫 School Profile Admins
Update your school's name and mailing address. The name appears at the top of every page.
Dismissal history and reports Admins
▶ Watch the video · 0:40
Every arrival and departure is saved the moment it happens. To download it:
- Go to Settings → 🛠️ Admin Tools → Download Dismissal History.
- Pick a range: Today, Last 7 days, This month, This school year, All dates, or your own From and To dates. Both dates are included.
- Choose Export Logs (.CSV). The file opens in Excel, Google Sheets or Numbers.
Each row in the file is one student on one day:
| Column | Meaning |
|---|---|
| DateLog, Time | The date and time the student left, in your local time zone. |
| StudentName, Grade, Homeroom | Who the student is. |
| DismissalMethod | Car, Bus or Walker, as they actually went home that day. |
| Status | Left, Absent if the student was marked absent that day, or Arrived (not marked Left) if staff didn't tap Left. |
| CarRiderNumber, BusNumber, Notes | Their numbers and note at the time. Today-only ride changes are noted, for example "Today-only ride change (usually Car #104)" or "Sub bus for Bus 12". |
| BoardedTime | For bus riders, the time staff tapped them onto the bus on the Arrived page. Blank if nobody did. See Checking students onto the bus. |
See it on screen: 📊 View as a report
Pick the dates the same way, then press 📊 View as a report instead of Export Logs. The records open right on the page with tools above them:
- Search this report finds any name, car number, bus or note; Filters adds a box under each heading to narrow one column.
- Click a column heading to sort; click again to reverse it.
- Group by rolls the records up, for example by date, homeroom, grade or dismissal method, with a count for each group.
- Columns chooses which columns show. Only those print and download.
- ⬇ PDF and ⬇ CSV download exactly what you see; 🖨 Print prints it.
Daily reset and record keeping
Every night, DismissPro saves the day's dismissals to your history and moves every student back to Not Arrived, ready for tomorrow. Alerts, Absent marks and bus Boarded taps are cleared at the same time (absences are saved to the history first). If a device was left open overnight, the board also resets when someone opens DismissPro the next morning.
Dismissal records are kept for as long as your state requires. For example, Tennessee requires 5 years. They are never deleted automatically, and if a school closes its account, its records are archived rather than erased.
Wi-Fi and power outages
If the Wi-Fi drops
Keep working. The status badge turns ● Offline, and changes you make are saved on your device. When the connection comes back, they sync automatically and the badge turns ● Online again.
Devices on cellular data keep working normally even if the school Wi-Fi is down.
Have a backup plan
Every school should have a plan for a power outage or a rare service interruption:
- Keep handheld radios charged and ready.
- Print a current roster with car and bus numbers from Settings → Admin Tools → Download Master Roster, and refresh it whenever your roster changes.
Passwords and security
▶ Watch the video · 0:45
Forgot the admin password
On the sign-in page, choose Forgot admin password?, enter your School ID, and choose Email Reset Link. We'll send a link to the admin email on file. The link works for 30 minutes.
Forgot or need to change the staff password
Staff passwords can't be reset by email. An admin sets a new one in Settings → 🛠️ Admin Tools → Change Staff Password. Anyone signed in with the old password is signed out.
How we protect your data
- Each school can only ever see its own students.
- Passwords are never stored in plain text.
- Connections are encrypted (https).
- We don't sell data, show ads, or share student information with unvetted third parties.
Read the full Student Data Privacy and Security Policy.
Free trial and billing Admins
- It is free for 12 months after signup.
- After that, DismissPro is $199 per school per year, with unlimited admins and staff.
- Using all seven SchoolPro apps? All seven are $899 a school year instead of $1,393, or pick any 3 for $479. Each app has its own free period, and each one runs separately. LibraryPro · See the free periods and the bundle.
- DismissPro never renews automatically. Nothing is charged unless you choose to pay.
- About 30 days before your year ends, we email the admin a link to renew. We send a reminder 7 days before and a final notice on the last day.
- On the renewal page you can pay by PayPal or card (a one-time payment for another year), download a quote, or ask for an invoice with your purchase order number (Net 30). A W-9 is available on request.
- Admins can also see when the school is paid through, and open the renewal page, in Settings → Billing.
- Each payment adds a full year, counted from the date your current year ends, so renewing early loses nothing.
- Asking for an invoice keeps your account active while your business office processes it (up to 30 days). If a renewal isn't paid by the end of the grace period, your account is paused. Nothing is deleted, and paying reactivates it right away, using the Renew to Reactivate button on the sign-in page.
Questions about billing? Contact us.
Troubleshooting
| Problem | Try this |
|---|---|
| Changes aren't showing on other screens | Check the badge at the top. If it says Offline, check the device's Wi-Fi or data. If it says Online, refresh the page. |
| Yesterday's students are still on Arrived or Left | Refresh the page or close and reopen the app. If they're still there, email support. |
| A teacher can't see some students | Their grade or homeroom filters are on. In Settings, uncheck all filters to see everyone. |
| I can't add students, upload a roster or send alerts | Those need the admin password. Sign out from Settings and sign back in as an admin. |
| The Bus or Car option on a student's switch is faded | The student doesn't have that number on file. Use 📅 Today to pick one just for today, or edit the student with 📝 and add it. |
| A bus card says "Replacing Bus 12 today" | Bus 12 broke down and an admin moved its riders to this bus for today. It goes back to normal tomorrow. |
| A bus or program name ends in "…" | Long names are shortened so they don't cover the buttons. Open the card to see the full name under each student. |
| A message at the bottom of the screen says a change wasn't saved | Read the message: for example, a car or bus number is missing, or (in the demo) a word isn't allowed. Fix it and try again. |
| A student is in a different car than usual | Look for the yellow Today only badge: an admin changed their ride for today, and it goes back to normal tomorrow. |
| Sign-in says the password is wrong | Check the School ID spelling and the password. If the staff password changed, ask your admin for the new one. |
| I was signed out unexpectedly | Admins are signed out after 30 minutes of inactivity, and everyone after 12 hours. Changing the staff password also signs staff out. |
| The Scan tags button doesn't open the camera | Your phone or browser is blocking the camera. Allow camera access for this site in the browser's settings, then tap 📷 Scan tags again. The page must be the secure https:// address. |
| A tag won't scan | Move closer or tap a bigger zoom, hold steady, and avoid glare on the windshield. The tag must face the camera and lie flat. You can always type the number on the keypad. |
| A scanned number stays on the screen | Scanned numbers stay until you check the car in, tap the ✕ on its chip, or tap Clear scan. |
| The tag says "That tag is from another school" | The tag was printed for a different school. Print tags from your own school's Settings → Admin Tools → Car Tags. |
| I don't see the Scan tags button or the Car Tags section | Refresh the page or close and reopen the app. If it's still missing, the Control Center admin may have turned it off for your school; contact support. |
| My uploaded roster looks wrong | Make sure the file is saved as .csv with the template's columns in the same order, and that each student is on their own row. |
Contact support
Can't find what you need? We're happy to help with setup, billing, or anything else. We'll even upload your roster for you: just email it to support@dismisspro.app. Send us a message and we'll reply by email.
Make a suggestion Everyone
Have an idea that would make dismissal easier? Tap the 💡 in the corner of the Active, Arrived and Left screens, or Make a suggestion in Settings or on our homepage. It opens a short form. We read every one.